How to Build Wooden Outdoor Benches with a Durable, Weather-Resistant Coating

How to Build Wooden Outdoor Benches with a Durable, Weather-Resistant Coating

Building Durable, Weather-Resistant Wooden Outdoor Benches

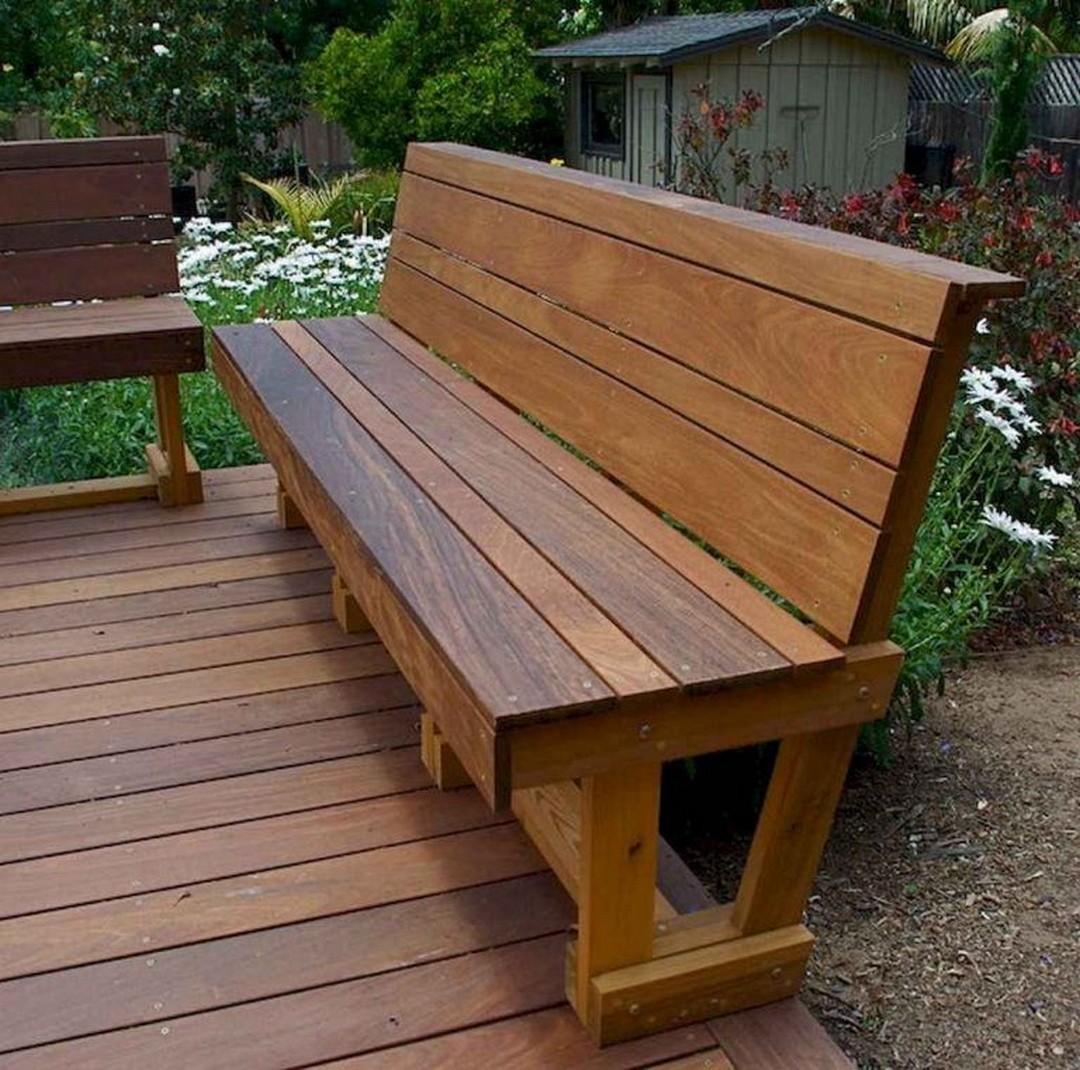
Outdoor benches provide a charming and functional addition to any garden, patio, or deck. With the right construction techniques and a durable finish, you can create a bench that will withstand the elements for years to come. This article will guide you through the process of building a sturdy wooden bench and applying a weather-resistant coating to protect it from the sun, rain, and harsh weather conditions.

Choosing the Right Wood

The choice of wood plays a crucial role in the longevity of your bench. Opt for hardwoods like cedar, redwood, or teak, known for their natural resistance to rot, insects, and weathering. These woods will last longer outdoors and require less maintenance.

Cedar

Cedar boasts a rich, reddish-brown color and emits a pleasant aroma. It naturally resists rot, insects, and moisture, making it a top choice for outdoor furniture.

Redwood

Redwood is another excellent choice, known for its distinctive reddish hue and exceptional durability. Its natural oils provide excellent protection against the elements.

Teak

Teak is renowned for its strength, durability, and natural oil content, making it a premium option for outdoor furniture. It develops a beautiful silver-gray patina over time, adding to its character.

If you prefer a more affordable option, consider pressure-treated pine or spruce. These woods are treated with chemicals to make them resistant to rot and insects, but they may require more frequent maintenance.

Designing Your Bench

Before you begin construction, carefully consider the design and size of your bench.

Dimensions

Measure the space where you plan to place the bench and determine the desired length and width.

Style

Explore various bench styles, from simple straight benches to curved designs with arms or backs. You can find inspiration online or in design books.

Construction Plan

Draw a detailed plan or find a free online blueprint that suits your needs. A well-thought-out plan will help you visualize the final product and streamline the construction process.

Gathering Materials and Tools

Once you have a design and plan, gather the necessary materials and tools. Here's a list of common items you will need:

  • Wooden lumber, based on your design and dimensions
  • Wood screws or bolts
  • Wood glue
  • Measuring tape
  • Level
  • Circular saw or hand saw
  • Drill with bits suitable for wood
  • Clamps
  • Safety glasses and gloves
  • Weather-resistant coating (paint, stain, or sealant)
  • Paintbrush or sprayer

Construction Process

With all your materials and tools ready, follow these steps to build your bench:

Cut the Lumber

Use your saw to cut the lumber according to your plan. Measure twice and cut once to ensure accurate dimensions.

Assemble the Frame

Start by assembling the frame of the bench. Join the pieces together using wood screws, bolts, or glue, depending on your design. Use clamps to secure the pieces while they bond.

Construct the Seat and Back

Attach the seat boards to the frame, making sure they are level and evenly spaced. If your design includes a back, attach it to the frame in the same manner.

Sand the Surface

Once the bench is assembled, sand the entire surface to remove any rough edges or splinters. This will ensure a smooth and comfortable finish.

Applying a Durable, Weather-Resistant Coating

A proper weather-resistant coating is essential to protect your bench from the elements and extend its lifespan. Here's a guide to choosing and applying the right coating:

Choosing a Coating

There are various options for weather-resistant coatings, each with its own advantages and disadvantages.

  • Paint provides a durable, colorful finish and can be easily refreshed when needed.
  • Stain allows the natural grain of the wood to show through while providing protection against the elements.
  • Sealant creates a protective barrier that repels water and moisture.

Consider the desired look, level of protection, and ease of maintenance when selecting a coating.

Applying the Coating

Follow the manufacturer's instructions for preparing and applying the coating. Generally, you will need to clean the bench surface, apply the coating in thin, even coats, and allow it to dry completely between coats.

Maintenance

Depending on the type of coating and the amount of exposure to the elements, your bench may require regular maintenance.

  • Paint may need touch-ups or a complete repaint every few years.
  • Stained benches may need to be restained every few years to maintain their color and protection.
  • Sealant typically needs to be reapplied every year or two.

Regular cleaning and occasional maintenance will help your bench last longer and keep it looking its best.

Finishing Touches

Once the coating is dry, you can add finishing touches to personalize your bench:

  • Hardware: Consider adding decorative hardware like hinges, latches, or bolts to enhance the design.
  • Cushions: Add cushions for extra comfort.
  • Plants: Place potted plants or flowers around the bench to create a vibrant and inviting setting.

Enjoy your new, durable outdoor bench, knowing that it will provide a comfortable and stylish seating option for years to come.

Share:

How to Make a Wooden Christmas Lantern

How to Make a Wooden Christmas Lantern

Crafting a Festive Wooden Christmas Lantern: A Step-by-Step Guide

Embrace the warmth and charm of the holiday season with a handcrafted wooden Christmas lantern. This project offers a unique opportunity to express your creativity and bring a touch of rustic elegance to your festive decor. From selecting materials to assembling the lantern, this guide will walk you through every step of the process, empowering you to create a truly one-of-a-kind piece.

Gathering the Essentials

Before embarking on your lantern crafting journey, ensure you have the necessary tools and materials readily available. This will make the process seamless and enjoyable.

Materials

  • Wooden Boards: Choose sturdy, smooth wooden boards for the lantern's base, sides, and top. Pine, cedar, or birch are excellent options for their natural beauty and ease of working with.
  • Wooden Dowels: Opt for dowels of appropriate thickness to create the lantern's frame.
  • Sandpaper: Use various grits of sandpaper to achieve a smooth finish on the wooden surfaces.
  • Wood Glue: Strong wood glue is essential for securing the various components of the lantern.
  • Screws: Select screws of appropriate size and length to reinforce the structure.
  • Decorative Hardware: Add a touch of whimsy with decorative hinges, latches, or knobs.
  • Paint or Stain: Personalize the lantern with your preferred color or wood stain.
  • LED Tea Lights: Choose battery-operated LED tea lights for a safe and flicker-free glow.

Tools

  • Saw: Use a hand saw or a miter saw to cut the wooden boards to size.
  • Drill: A drill with various drill bits will be needed for creating pilot holes and attaching hardware.
  • Screwdriver: A screwdriver or drill driver will be helpful for securing the screws.
  • Clamps: Clamps will ensure a secure bond while the glue dries.
  • Measuring Tape: Accuracy in measurements is crucial for a well-proportioned lantern.
  • Pencil: Use a pencil for marking the wood before cutting or drilling.
  • Safety Glasses: Always protect your eyes while working with woodworking tools.

Crafting the Lantern Base

The base of the lantern provides a stable foundation for the entire structure. Its size will determine the overall dimensions of the lantern.

  1. Determine Base Size: Decide on the desired width and length of the lantern base. Measure and mark the wooden board accordingly.
  2. Cut the Base: Use a saw to carefully cut the board along the marked lines. Smooth any rough edges with sandpaper.
  3. Sand the Base: Thoroughly sand the base to ensure a smooth surface, removing any splinters or imperfections.

Constructing the Lantern Sides

The lantern sides are the most visually prominent component. The design and shape of the sides will largely define the lantern's aesthetic.

  1. Design the Sides: Determine the desired height and width of the lantern sides. You can choose to create rectangular sides for a classic look or experiment with other geometric shapes like triangles or trapezoids.
  2. Cut the Side Panels: Using a saw, accurately cut the wooden boards according to your design. For intricate shapes, it might be helpful to use a jigsaw.
  3. Sand the Sides: Sand each side panel thoroughly to achieve a smooth, polished surface.

Assembling the Lantern Frame

The frame provides structural support for the lantern and helps to create its distinct silhouette.

  1. Cut Dowels: Measure and cut wooden dowels to the desired length for the frame. Ensure the dowels are long enough to extend beyond the sides of the lantern.
  2. Attaching Dowels: Drill pilot holes on the base and side panels where the dowels will be attached. Apply wood glue to the dowels and insert them into the drilled holes. Secure them with screws.
  3. Reinforce the Frame: Consider adding additional dowels or wooden supports to enhance the frame's stability, especially if the lantern will be hanging.

Creating the Lantern Top

The lantern top serves as the lid and adds the finishing touch to the overall design.

  1. Cut the Top: Measure and cut a piece of wood to create the lantern top. The top should fit snugly over the frame, leaving a slight overhang for a secure fit.
  2. Sand the Top: Smooth any rough edges on the top with sandpaper.
  3. Decorative Touches: Consider adding decorative elements to the top, such as a small handle for opening and closing the lid or a decorative knob.

Finishing Touches

After the lantern is assembled, it's time to add the final touches that will enhance its beauty and functionality.

  1. Painting or Staining: Apply your chosen paint or stain to the entire lantern, ensuring even coverage. Allow the paint or stain to dry completely before proceeding.
  2. Adding Hardware: Attach decorative hinges, latches, or knobs for a touch of personality and functionality.
  3. Finishing Touches: Once the paint or stain has dried, add a layer of varnish or sealant to protect the wooden surface.

Illuminating the Lantern

The moment of truth has arrived! It's time to bring your wooden lantern to life with the warm glow of LED tea lights.

  1. Insert LED Lights: Place the LED tea lights inside the lantern, ensuring they are centered and secure.
  2. Enjoy the Ambiance: Turn on the LED lights and admire the soft, inviting glow emanating from your handcrafted Christmas lantern.

Tips for Success

To ensure a successful lantern crafting experience, consider these helpful tips:

  • Plan Ahead: Sketch a design for the lantern, including its dimensions and features, before starting to cut materials.
  • Measure Twice, Cut Once: Precision is key in woodworking. Double-check your measurements to avoid errors.
  • Use Safety Gear: Always wear safety glasses and appropriate protective gear when working with woodworking tools.
  • Let Glue Dry Thoroughly: Allow the wood glue to dry completely before proceeding to the next step.
  • Sanding is Essential: Sanding the wooden surfaces ensures a smooth finish and a more professional look.
  • Get Creative: Feel free to experiment with different designs, decorative elements, and paint or stain colors.

Crafting a wooden Christmas lantern is a rewarding project that allows you to express your creativity and create a beautiful and functional piece of holiday decor. By following these step-by-step instructions and incorporating your personal touches, you can bring a warm and inviting glow to your home this holiday season. May your lantern project be filled with joy, laughter, and the magic of the festive season!

Share:

How to Build Outdoor Benches That Are Built to Last and Resist the Elements

How to Build Outdoor Benches That Are Built to Last and Resist the Elements

How to Build Outdoor Benches That Are Built to Last and Resist the Elements

Outdoor benches are a great way to add seating to your backyard, patio, or porch. They're perfect for relaxing, enjoying the outdoors, or entertaining guests. But if you want your outdoor bench to last for years to come, you need to build it with materials that can withstand the elements.

In this guide, we'll walk you through the process of building an outdoor bench that's built to last. We'll cover everything from choosing the right materials to assembling the bench and finishing it off.

Choosing the Right Materials

The first step in building a durable outdoor bench is choosing the right materials. You'll want to select materials that are:

  • **Weather-resistant:** The materials should be able to withstand rain, snow, sun, and wind without warping, rotting, or fading.
  • **Durable:** The materials should be strong enough to support the weight of people sitting on the bench.
  • **Low-maintenance:** You don't want to spend a lot of time caring for your bench, so choose materials that are easy to clean and maintain.

Here are some of the best materials for outdoor benches:

Wood

Wood is a classic choice for outdoor furniture, and for good reason. It's beautiful, durable, and relatively inexpensive. Here are some popular wood choices for outdoor benches:

  • **Cedar:** Cedar is a naturally rot-resistant wood that also has a beautiful reddish hue. It's a good choice for benches that will be exposed to the elements.
  • **Redwood:** Redwood is another rot-resistant wood that's known for its rich reddish-brown color. It's a bit more expensive than cedar, but it's also more durable.
  • **Teak:** Teak is a tropical hardwood that's extremely durable and weather-resistant. It's also naturally oil-rich, which helps protect it from water damage. Teak is the most expensive of the wood options, but it's also the most long-lasting.
  • **Pressure-treated pine:** Pressure-treated pine is a less expensive option than cedar or redwood, but it's still a good choice for outdoor benches. Pressure-treating the wood helps protect it from rot and insects.

If you choose to build your bench from wood, be sure to seal it with a weather-resistant finish, such as a stain or paint. This will help protect the wood from the elements and keep it looking its best.

Metal

Metal is another great option for outdoor benches. It's strong, durable, and easy to maintain. Here are some popular metal choices for outdoor benches:

  • **Aluminum:** Aluminum is a lightweight, rust-resistant metal that's easy to work with. It's a good choice for benches that will be exposed to rain and snow.
  • **Steel:** Steel is a strong and durable metal that can withstand a lot of weight. However, steel can rust if it's not properly treated. To prevent rust, you can choose steel that's been galvanized or powder-coated.
  • **Wrought iron:** Wrought iron is a traditional metal that's known for its strength and durability. It's often used for benches with ornate designs.

Metal benches can be left unfinished or painted with a weather-resistant paint.

Concrete

Concrete is a very durable material that's well-suited for outdoor furniture. Concrete benches are heavy and can be difficult to move, but they're also very strong and long-lasting. Concrete can be poured into molds to create a variety of shapes and designs.

Concrete benches can be left unfinished or stained with a sealant to enhance their appearance. You can also add decorative elements, such as stones or glass, to the concrete mix.

Design

Once you've chosen your materials, you can start designing your bench. There are many different designs to choose from, so you can find one that fits your style and needs.

Here are some things to consider when designing your bench:

  • **Size:** How big do you want your bench to be? Think about how many people you want to seat on the bench and the space you have available.
  • **Shape:** Do you want a straight bench, a curved bench, or a bench with a back?
  • **Style:** What style do you want your bench to have? Traditional, modern, rustic, or something else?
  • **Features:** Do you want your bench to have any special features, such as armrests or a storage compartment?

You can find inspiration for bench designs online, in magazines, or at home improvement stores. You can also draw your own design on paper or use a computer-aided design (CAD) program.

Assembling Your Bench

Once you've designed your bench, you can start assembling it. The assembly process will vary depending on the materials and design you choose. Here are some general tips for assembling an outdoor bench:

  • **Read the instructions carefully.** Make sure you understand the steps before you start assembling your bench.
  • **Use the right tools.** You'll need a variety of tools, such as a saw, drill, screwdriver, hammer, and level.
  • **Take your time.** Don't rush the assembly process. It's better to take your time and make sure everything is done correctly.
  • **Double-check your work.** As you go, make sure all of the pieces are aligned and securely fastened.

If you're not comfortable with woodworking or metalworking, you can always hire a professional to assemble your bench.

Finishing Your Bench

Once your bench is assembled, you'll need to finish it to protect it from the elements. The type of finish you need will depend on the materials you used.

Wood

If you built your bench from wood, you'll need to seal it with a weather-resistant finish. This will help protect the wood from rot, insects, and UV damage. Here are some popular finishes for outdoor wood benches:

  • **Stain:** Stain will penetrate the wood and add color without hiding the grain.
  • **Paint:** Paint will provide a solid color and a protective layer.
  • **Polyurethane:** Polyurethane is a clear sealant that will protect the wood from water and UV damage.

Metal

If you built your bench from metal, you may need to protect it from rust. You can prevent rust by:

  • **Galvanizing:** Galvanizing is a process of coating the metal with zinc, which helps prevent rust.
  • **Powder coating:** Powder coating is a process of applying a powder coating to the metal, which forms a durable and weather-resistant finish.
  • **Painting:** Painting the metal with a rust-resistant paint will help protect it from the elements.

Concrete

Concrete is a durable material that can withstand the elements, but it can benefit from a sealant. A sealant will help protect the concrete from stains and water damage.

Enjoying Your New Bench

Once your bench is finished, you can enjoy it for years to come. Here are some tips for caring for your outdoor bench:

  • **Clean it regularly.** Clean your bench with soap and water or a mild cleaner.
  • **Refinish it as needed.** You may need to reapply a finish to your bench every few years to protect it from the elements.
  • **Store it indoors during the winter.** If you live in a climate with harsh winters, you may want to store your bench indoors during the winter months to protect it from the elements.

With a little care and attention, your outdoor bench can provide you with years of enjoyment.

Commonly Asked Questions

**Q: What is the best wood for outdoor benches?**

**A:** The best wood for outdoor benches is cedar, redwood, or teak. These woods are naturally rot-resistant and durable.

**Q: How do I prevent my metal bench from rusting?**

**A:** You can prevent your metal bench from rusting by galvanizing it, powder coating it, or painting it with a rust-resistant paint.

**Q: How do I clean my outdoor bench?**

**A:** You can clean your outdoor bench with soap and water or a mild cleaner.

**Q: How often do I need to refinish my outdoor bench?**

**A:** You may need to refinish your outdoor bench every few years to protect it from the elements.

Share:

Make your own magic box: a woodworking guide

Make your own magic box: a woodworking guide

Create Your Own Enchanting Magic Box: A Comprehensive Woodworking Guide

Embark on a whimsical woodworking journey and craft your own mesmerizing magic box! This guide will lead you through every step, from selecting the perfect wood to adding a touch of enchantment. Get ready to unleash your creativity and build a magical treasure that will spark wonder and delight.

Gather Your Supplies

Before you dive into the woodworking magic, ensure you have all the necessary tools and materials. This project requires a bit of precision and creativity, so having the right equipment will make the process smoother and more enjoyable.

Wood Selection

Choose a wood that speaks to your artistic vision. For a classic, timeless feel, opt for hardwoods like cherry, maple, or walnut. These woods are known for their durability and rich grain patterns. If you prefer a lighter and more whimsical aesthetic, consider pine, cedar, or birch.

Essential Tools

You'll need a few essential tools to bring your magic box to life:

  • Table saw
  • Miter saw
  • Jig saw
  • Hand saw
  • Sandpaper (various grits)
  • Clamps
  • Wood glue
  • Screwdriver
  • Measuring tape
  • Pencil
  • Safety glasses
  • Dust mask

Feel free to supplement this list with additional tools that you find helpful. Remember, safety first! Always wear safety glasses and a dust mask when working with wood.

Designing Your Magic Box

Now, let your imagination run wild! Sketch out your magic box design on paper. Consider these factors:

  • Size and Shape: Will it be a compact treasure chest or a grand, intricate box?
  • Style: Do you envision a classic, ornate box or something more modern and minimalist?
  • Secret Compartments: Add a touch of mystery with hidden compartments or drawers.
  • Finishing Touches: Think about how you'll embellish your box. Will you use paint, stain, or decorative hardware?

Cutting and Assembly

With your design in hand, carefully transfer it to your wood. Use the table saw and miter saw to make accurate cuts. Take your time and make sure your measurements are precise. Once all the pieces are cut, use wood glue and clamps to assemble your magic box. Allow the glue to dry completely before proceeding.

Adding Magic

This is where the true enchantment begins! Here are some ideas to make your box truly magical:

  • Intricate Carvings: Carve delicate patterns or symbols into the wood to add visual depth and intrigue.
  • Hidden Compartments: Create secret compartments for storing trinkets, letters, or other treasures.
  • Mirror Tiles: Incorporate small mirror tiles into the box's interior to create a captivating optical illusion.
  • Luminous Accents: Add small, battery-operated LED lights to illuminate the interior.

Finishing Touches

Now, it's time to give your magic box its final polish! Sand it down with sandpaper of progressively finer grits, starting with coarse and ending with fine. This will create a smooth and polished surface. Apply a stain or paint to achieve your desired color and finish. Consider adding decorative hardware like hinges, latches, or handles to complete the look.

Unleash Your Magic

Congratulations! You've crafted your own enchanting magic box, a testament to your creativity and woodworking skills. Fill it with your cherished treasures, secrets, or simply the joy of making something unique and special. Enjoy the magic it brings!

Share:

How to build a wooden gun case for a small collection

How to build a wooden gun case for a small collection

Building a Wooden Gun Case for Your Small Collection

A well-crafted wooden gun case not only safeguards your treasured firearms but also adds a touch of elegance and sophistication to your collection. Whether you're a seasoned gun enthusiast or a novice collector, constructing your own gun case can be a rewarding and fulfilling project. With the right tools, materials, and a bit of patience, you can build a custom-made case that perfectly accommodates your firearms and reflects your personal style.

Choosing the Right Wood

The type of wood you choose will significantly impact the look, durability, and cost of your gun case. For a classic and elegant appearance, consider hardwoods like walnut, cherry, or maple. These woods are known for their rich grain patterns and natural resistance to scratches and dents. If you're looking for a more affordable option, softwoods like pine or cedar are also suitable choices. Just keep in mind that softwoods may be less durable and require more careful handling.

Essential Tools and Materials

Before you start building, ensure you have the necessary tools and materials on hand. This includes:

  • Saw (table saw, circular saw, or hand saw)
  • Router
  • Drill press or cordless drill
  • Sandpaper (various grits)
  • Wood glue
  • Clamps
  • Finish (stain, paint, or varnish)
  • Wood screws
  • Hinges
  • Latch or lock
  • Felt or foam padding
  • Measuring tape
  • Pencil or marker

Planning Your Gun Case

Before you start cutting wood, take the time to carefully plan your gun case design. Determine the dimensions based on the size of your firearms and desired storage capacity. Consider the number of compartments you need, whether you want to include dividers, and any additional features such as drawers or compartments for accessories.

Cutting and Assembling the Case

Once you have a detailed plan, you can begin cutting the wood pieces for the case. Accurately cut the sides, bottom, top, and any dividers using your chosen saw. Pay attention to the grain direction for optimal strength and stability. Use wood glue and clamps to securely join the pieces together. Allow the glue to dry completely before moving to the next step.

Adding Finishing Touches

Once the case is assembled, you can begin adding the finishing touches. Sand all surfaces smooth, starting with coarse sandpaper and progressing to finer grits for a smooth finish. You can choose to stain the wood to enhance its natural grain patterns or paint it in a color of your choice. Apply multiple coats of your chosen finish for durability and a polished look.

Interior Padding and Storage

To protect your firearms from scratches and movement, line the interior of the case with felt or foam padding. You can cut the padding to fit snugly around the guns, providing a secure and cushioned environment. Consider adding dividers or compartments within the case to separate different firearms or store accessories such as cleaning supplies or ammunition.

Adding Hardware

The final step is to install the hardware. Attach hinges to the lid and case body, ensuring they are positioned for smooth opening and closing. Install a latch or lock for security and peace of mind. You can also personalize your case by adding decorative elements like brass accents or custom engraved nameplates.

Congratulations! You have now built your own custom wooden gun case. This project will not only enhance your firearms collection but also provide you with a sense of accomplishment and a unique piece of craftsmanship to display.

Share:

How to build a magic box: woodworking tutorial

How to build a magic box: woodworking tutorial

Building a Magical Wooden Box: A Woodworking Tutorial

Prepare to be enchanted! This woodworking project guides you step-by-step to craft a beautiful and functional wooden box. Perfect for storing treasures, secrets, or even magical trinkets, this box will be a unique addition to your home or a special gift. We'll guide you through every stage, from choosing your wood to applying the finishing touches. Grab your tools, let's get started!

Materials You'll Need

Before we begin, gather all your materials to ensure a smooth woodworking experience:

  • Wood: Choose a sturdy wood like oak, maple, or cherry. Consider the look and feel you want for your box. For a more rustic style, use reclaimed wood.
  • Wood Glue: A high-quality wood glue is essential for strong joints.
  • Screws: Use screws that are appropriate for the thickness of your wood.
  • Hinges: Select decorative hinges that complement your box's style. These will add visual appeal and ensure the box opens and closes smoothly.
  • Latch or Lock: Choose a latch or lock that suits your box's purpose and aesthetic. A simple latch or a decorative lock can add a touch of intrigue.
  • Sandpaper: You'll need different grit sandpaper for smoothing and finishing your box. Start with a coarse grit, gradually moving to finer grits.
  • Wood Stain or Paint: Optional, but consider adding a stain or paint for a personalized touch.
  • Finishing Oil or Wax: To protect and enhance the beauty of your wood, use a finishing oil or wax.
  • Measuring Tape, Pencil, Ruler, and Cutting Guide: For accurate measurements and marking.
  • Safety Glasses and Dust Mask: Protect your eyes and lungs while working with wood.

Step 1: Design and Planning

Before you grab your saw, take some time to design your box. This step is crucial to ensure you create something you'll love.

  • Dimensions: Determine the desired length, width, and height of your box. This will affect the amount of wood you need.
  • Style: Choose a style that resonates with you. You can opt for a simple rectangular box or add intricate details like moldings or decorative inlays.
  • Lid: Decide whether you want a hinged lid or a removable top. This will influence the construction process.
  • Hardware: Consider what type of hinges, latch, or lock you want. Look for ones that align with your design aesthetic.
  • Sketch: Draw a rough sketch of your box to visualize the final product.

Step 2: Cutting the Wood

Now comes the fun part! With your design in mind, you're ready to start cutting your wood. Take your time, measure twice, and cut once!

  • Cut the Base and Sides: Use a saw or table saw to accurately cut the pieces for the base and sides of your box. Remember to account for the thickness of the wood when determining the dimensions.
  • Cut the Lid: If you're creating a hinged lid, cut the lid piece slightly larger than the base to allow for proper fitting.

Step 3: Assembling the Box

With all your pieces cut, you're ready to assemble the box. Focus on creating strong and precise joints.

  • Join the Sides to the Base: Use wood glue and screws to attach the sides to the base of the box. Clamp the pieces together and ensure they are flush and square.
  • Attach the Lid: If you are using a hinged lid, attach the hinges to the lid and the box using screws. Ensure the hinges are aligned and allow the lid to open and close smoothly.
  • Install the Latch or Lock: Follow the manufacturer's instructions for attaching the latch or lock. This step will secure your precious contents.

Step 4: Sanding and Finishing

Once your box is assembled, it's time to refine its look and feel.

  • Sanding: Use sandpaper to smooth the box's surfaces, edges, and corners. Start with a coarse grit, gradually moving to finer grits to achieve a polished finish.
  • Finishing: Apply a stain or paint if desired, following the manufacturer's instructions. Allow the finish to dry completely before moving on.
  • Apply Finishing Oil or Wax: To protect the wood and enhance its natural beauty, apply a finishing oil or wax. Rub the oil or wax evenly into the wood and let it dry completely.

Step 5: Adding Your Personal Touch

Now for the magical touch! This is where you can truly make your box unique.

  • Inlay or Carving: Consider adding decorative inlays or carvings to elevate the box's aesthetic.
  • Hardware: Use decorative hinges, latches, or locks to add visual interest and enhance the box's character. This is your chance to add a touch of magic!
  • Interior Lining: Line the inside of the box with fabric, velvet, or a decorative paper to add a touch of luxury and create a special environment for your treasures.

And there you have it! Your beautifully crafted magic box is ready to be filled with secrets, treasures, or a touch of enchantment. Enjoy your new woodworking masterpiece and the joy it brings to your home.

Share:

Diy guide to building a wooden gun cabinet for your collection

Diy guide to building a wooden gun cabinet for your collection
Share:

Postingan Populer

Search This Blog

Powered by Blogger.

Blog Archive

Entri yang Diunggulkan

How to Build Wooden Outdoor Benches with a Durable, Weather-Resistant Coating

Building Durable, Weather-Resistant Wooden Outdoor Benches Outdoor benches provide a charming and functional addition to any garden, pat...

Blog Archive

Recent Posts

Pages

Theme Support